|

For this tutorial you will need psp. I am using psp9.
You can download a free 30 day trial of pspx
A tube of your choice, or the tube I'm using
The font I'm using is BoyzRGross. Download and unzip. Make sure you have the font open
in you task bar.
Ok lets begin:
Open a new image 400 x 400 white background.

Open your picture tube and save to your tube folder.
::File ::export ::picture tube.
Name the tube butterfly1 and press OK.
Now click on your tube icon

Change to scale of the tube to 65

Now add a new layer.
::Layer:: new raster layer :: OK.
Place the tube on your blank canvas and using the mover tool move
it to where you like it best.

Click on the text tool and type in your name using these settings...
: Font - BoyzRGross:
:foreground color - #0548a6:
:Background color - #69aff4:
:Size - 72:
:create as - Floating:
:Stroke width - 2:
Press OK.
Using your mover tool place your name where you like it best.
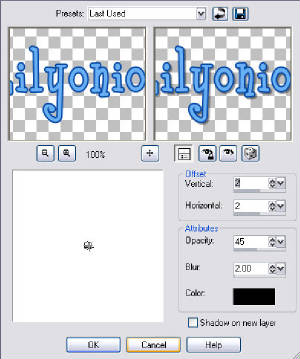
Now add a drop shadow
:Effects ::3D effects :: Drop shadow:
Use the settings below.
Now on your layer palette right click on the floating selection and hit 'promote selection
to layer'

Go to Selections :: select none.
Now go to layers :: Merge :: Merge visable.
Grab your magic wand and use the settings below ..


Holding down the shift key click inside each of your letters .

Now on your layer palette right click on your merged layer and duplicate it two more
times, so now you have 3 layers.
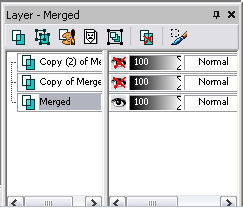
X out your first 2 layers (click on the eye icons at the side of the layers) make sure
you're working on the 3rd layer (it should be highlighted.)
Now go to Adjust :: Add/remove noise :: Add noise.
Use the settings below . .

Click OK.
Now X out that 3rd layer and go to your 2nd layer. Un X and highlght it.
Again go to Adjust :: Add/remove noise :: Add noise.
Use the same settings but change the noise % to 22. Hit OK
Again X out that 2nd layer and un X and highlight your 1st layer. Do as above but this
time change the noise % to 26.
Now un X all your layers so they're all showing.
Go to selections :: Select none.
File :: Save as :: glittername.
Open up animation shop and find the glittername you've just saved and run the
animation.

Crop the image if need be and save.
Voila! you now have your glitter name.

|
